Whether you’re a newcomer to Go or someone with a foundational understanding of the language eager to create your first Golang application, this is the tutorial for you.
An effective approach to learning a new programming language is to implement tools you are already familiar with in that language. That’s precisely what we’re going to do here. We will be building a simplified yet functional version of the ‘which’ command from Unix systems, which we will call go-which.
I’ll guide you step by step, and by the end, you should have a clear understanding of many Go concepts and how to write a basic Command Line Interface (CLI) command in Go.
Happy reading (and hopefully learning) 😉
What’s The ‘which’ Command ?
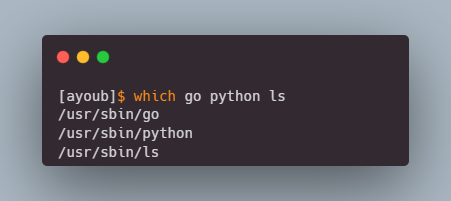
If you’ve used Linux or any other Unix-like system, you migh have come across the ‘which’ command. It’s a straightforward yet powerful command used to locate the path of executable binaries in the system.
It’s often used when scripting or debuging to ensure that the correct binary is being executed. Especially when there are multiple versions of the same program installed.
For instance, if you type which python in a Unix terminal, the command searches through the directories listed in your $PATH environment variable. If it finds the Python executable, it prints its full path to the standard output. This output helps you know which Python version will be executed when you run the python command.
The PATH environment variable is available in Linux, Windows and macOS, it lists the specific directories where executable programs are stored. This variable enables users to run programs from the command line without needing to input the full path to the file.
Planning The ‘go-which’ Command
‘go-which’ will mimic the basic functionality of the original ‘which’ command and will be executed as follows: go-which [executableName]
We can break down the command’s expected behavior into four main steps:
- Reading User Input: After executing the command, the first step is to parse the command-line arguments to identify the executables the user wants to locate.
- Reading the PATH Environment Variable: Next, we’ll read the PATH environment variable to determine the directories where we should search for the binaries.
- Searching for Binaries: Then, we’ll look for the desired binary files in the extracted directories.
- Outputting Results: Finally, if the executables are found, we’ll print their full paths to the console.
Coding The Command
Enough with the blabla, let’s start coding 🥳
Starting Point: A Simple Hello World Program
For the sake of complete beginners, we will start with a simple Hello World program, you can skip this part if you are already familiar with the language.
| |
💡 How To Run Go Code (click to expand) 💡
To run the code above, put the code in a filehello-world.goand use the commandgo runinside the parent directory where your code is located.$ go run hello-world.go Hello, World!Go is compiled language, so if you want to build your program into a binary, use
go build$ go build hello-world.go $ ls hello-world hello-world.goYou can then execute the built binary directly.
$ ./hello-world
Hello, World!
Let’s break down each part of the Hello World program:
package main: Every Go program must start with a package declaration, Packages are how we organize code and reuse it, every Go program must have a main package and a main function (which we are going to see in a moment)import "fmt": After that we have the import statements, imports are used to include code from other packages that we can use in our code without having to reinvent the wheel, in our case, ‘fmt’ is a standard library package that comes with Go, which provides input/output functionality, like printing text to your standard output (btw, fmt stands for format).func main(): Main function, This is the entry point of our Go program, when you run a program, the code inside the main function gets executed. (FYI, the main function in go doesn’t accept any arguments nor does it return any values)fmt.Println("Hello, World!"): Here we are using thefmtpackage that we talked about earlier to print to the standard output (screen) the message “Hello, World!”.
Reading User Input
Now, let’s build on the simple Hello World program to create the go-which command.
For the go-which command to execute properly, the user needs to specify a list of executables to search for, we will be working with just one argument for now in the following format: go-which [executableName]. The question is how do we access this executable name inside our program? To do this, we will use another standard Go package called os, which allows us to interact with the underlying operating system.
First, add os to your list of imports:
| |
once you have imported the os package, you can access the command-line arguments in the main function using: os.Args
os.Args is a slice (similar to an array) that contains all the command-line arguments used when calling the program, the first element in os.Args is always the path to the file itself,
for example, let’s say the we called our program using the following command /usr/bin/go-which python ls, os.Args would look like this:
os.Args[0] --> '/usr/bin/go-which'
os.Args[1] --> 'python'
Inside the main function add the following line arguments := os.Args, this will create a slice variable
called arguments and stores the content of os.Args in it.
If you are familiar with other programming languages you might wonder why we use
:=instead of just=for assignment. Well, in Go,:=is used to declare a variable and initialize at the same time, while=is used to assign a value to an already declared variable, for example, the following two examples are identical in behavior:
1
2
// Example 1: var count = 5 // count declared with var and initialized with =
1
2
// Example 2: count := 5 //count declared and initialized with :=
Now what if the user forgets to enter an argument while calling the function? in this case, we won’t have any file names to search for, To handle this situation, we should check the number of arguments in our arguments slice, if the number is less than 2 (remember, the first element in os.Args is the program’s file name), we should stop the program and alert the user. We can also check if the number of arguments is more than 2, we can then inform the user that our go-which command accepts only one argument (btw, we will be adding support for multiple arguments in future post of this series, I’ll link it here when
it’s done)
To count the number of arguments we can use the len() function. Add the following code to the main function:
| |
The if statement will assess if the number of arguments is less than 2, if that’s the case, it
will print an error message and exit the program using the return statement.
💡 Go ahead and test the program now, if you don’t provide any arguments, it should print the error message to the screen.
Reading the PATH Environment Variable
To locate executables, go-which needs to know where to look, and this is where the PATH environment variable comes into play. The PATH environment variable lists directories that the operating system searches for executables. It’s a critical part of how command-line tools work in Unix-like systems as well as Windows.
To access the PATH environment variable in Go, we again turn to the standard os package, which provides a function to read environment variables. Here’s how you can do it:
| |
os.Getenv("PATH") fetches the value of the PATH environment variable. This value is a string containing a list of directories separated by a semicolon (;) in Windows and by a colon (:) in Linux and macOS.
Now, we need to split this string to get each directory separately. While we could write our own function to split the string based on the operating system’s specific separator, Go provides a more straightforward solution. The path/filepath package offers an os-independent way to handle such tasks.
Ensure you have imported the path/filepath package, and then add the following line to your main function:
| |
The filepath.SplitList function takes the PATH string and returns a slice containing each directory. This function is aware of the different separators used in Windows and Unix-like systems, so you don’t have to worry about handling them yourself.
With the list of directories in hand, we’re one step closer to implementing our go-which command.
Searching For Binaries
Having the list of directories from the PATH environment variable, our next task with go-which is to search for the specified executable within these directories. This involves checking each directory to see if it contains the executable file the user is looking for.
Iterating Over Directories
First, we’ll iterate over each directory in the PATH. We’ll use a for range loop for this, which is an efficient way to go through each element in a slice in Go. Here’s the basic structure:
| |
In this loop:
- We are using a
for rangeloop to iterate over all the elements in the pathList variable. rangein Go when used with a slice variable will return two values at each iteration. the first is the index of the current element, and second is value of the current element.- Our code could look something like this
for index, directory := range pathList {...}but we used the underscore sign instead of the index variable, that’s because we only need the directory name, _ is used as a placeholder for a variable when we don’t need the returned variable.
If you run the code now, it will print all directories listed in the PATH environment.
Checking For The Executable
When looking for executables, there are three file charachteristics that we need to check for:
- If the file exists
- If the file is a regular file and not a directory ( becuase in Unix-like systems everything is a file )
- If the file is executable
To implement these verifications, add the following code to our loop:
| |
Breaking down the new code:
fullPath := filepath.Join(directory, file): We start by combining the directory with the executable name (provided by the user as the second argument) to get the fulle path path of the file. We use thefilepath.Join()function because it takes care of adding the appropriate os-specific separator.fileInfo, err := os.Stat(fullPath):os.Stat()basicaly returns file information like file type and permissions etc (read more about it HERE ). if the file doesn’t existos.Stat()returns an error.
💡 Error handling in Go (click to expand) 💡
Error handling in Go is distinct compared to other programming languages. It doesn’t use the try-catch mechanism found in languages like Java or Python. Instead, Go handles errors by returning an error value as part of the function’s return values, Ex:result, err := someFunction(). This approach is straightforward and integrates seamlessly with Go’s other features like multiple return values. You can read more about Go error handling HERE .
if err == nil {}: In Golang, when catching errors, if an operation was successful the valuenilis returned for the err, in our examplet,err == nilmeans the file exists.mode := fileInfo.Mode: FromfileInfo, we get the file’s mode which contains its permission bits and other information like whether the file is a directory, regular file or symbolic link, etc.if mode.IsRegular() && mode&0111 != 0 {}: We then check for two things:mode.IsRegular()confirms the file is a regular file (not a directory or a link)mode&0111 != 0checks if the file is executable. The0111mask corresponds to executable permissions in Unix systems (user, group, others). The & operator performs a bitwise AND operation betweenmodeand0111, and if the result is not zero, at least one executable bit is set. (Read more about it HERE )
returnif the file was found, we usereturnafter printing the path to finish the program, otherwise, the program will continue to search for the executable in next iterations.
So basicaly, this simple version of the
whichcommand will go through the PATH directories in the order they are extracred, each time looking for if the executable exists in the current folder, if it’s a regular file and if it’s executable, if all three conditions are met, it prints the full path of the executable to the screen and exits without going through the remaining directories.
The final code should now look like this:
| |
Next Steps
Congratulations on making it to the end of this tutorial! By now, you should have a good grasp of some fundamental Go concepts and how to write a basic CLI application. We’ve taken a journey from understanding the Unix which command to building our own version, go-which, using Go.
While we’ve kept this tutorial simple to ensure it’s beginner-friendly, there’s always room for improvement and additional features. In future installments of this series, I plan to enrich go-which with more functionalities, including, in no particular order:
- Adding Support for Multiple Arguments: Enhancing the command to handle multiple executable names in one command.
- Verbose Output Option: Implementing a -v or –verbose flag for detailed output.
- Colorized Output: Making the output more user-friendly with colored text.
- Cross-Platform Compatibility: Ensuring go-which works seamlessly across different operating systems.
- Displaying Multiple Paths: Modifying the command to show all possible paths for an executable.
- Installation Script: Creating a script for easy global installation of go-which.
- Alias Resolution: Extending functionality to resolve and display actual commands for aliases.
I encourage you to try implementing these features yourself as a way to deepen your understanding of Go.
Your contributions, ideas, and improvements to the code are welcome and appreciated. Feel free to fork the project repository and share your enhancements!
🌟 Project Repository: https://github.com/AyoubIssaad/go-which
Stay tuned for more updates, and happy coding folks! 😉